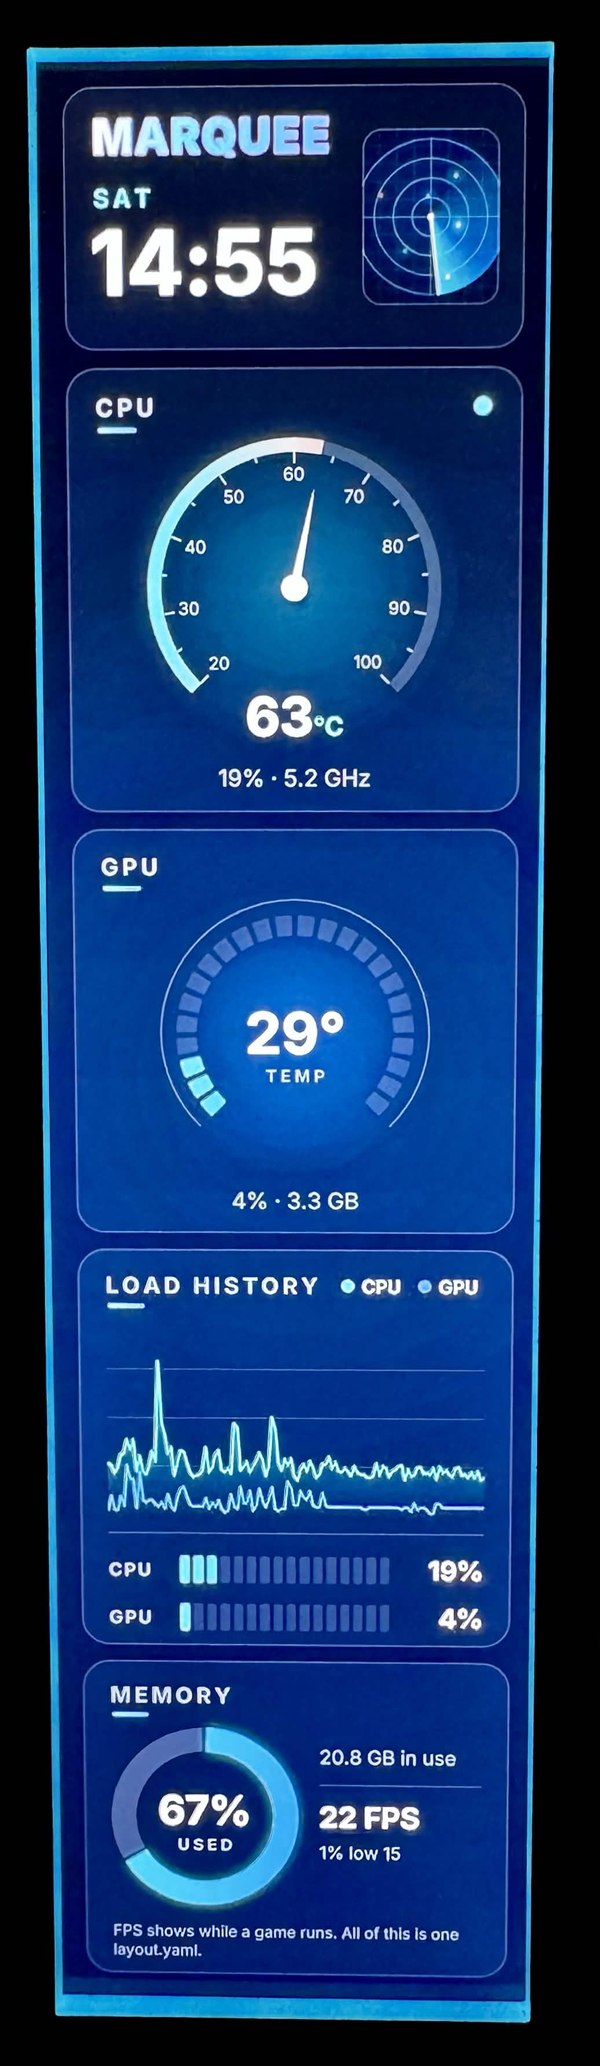
Step-by-step tasks for Marquee, from the first install to your own themes. Each heading links to itself, so
you can send someone straight to the step they need.
Open the latest release
and download Marquee-<version>-x64.msi. It’s the only file you need. The release’s other files
(signatures, checksums, a standalone marquee zip and GitHub’s “Source code”) are optional.
Run the MSI. If Windows SmartScreen says it protected your PC, choose More info, then
Run anyway.
Approve the administrator prompt. Marquee installs for every user and includes the .NET runtime.
Why SmartScreen appears
The MSI has no Authenticode signature yet, so Windows doesn’t know the publisher and an “unknown
publisher” prompt is expected. Updates are a separate matter: Marquee checks a signature of its own
before it installs one (see Updates and signatures).
Screenshot to come
SmartScreen: choose More info, then Run anyway.
The installer adds:
the tray app, and Marquee Theme Editor in the Start menu;
the marquee command, in any terminal you open afterwards;
a logon task that starts the tray each time you sign in.
A newer MSI upgrades in place and keeps your settings and themes. Uninstall from Windows’
Settings → Apps. Your themes and settings in %LOCALAPPDATA%\Marquee stay, in
case you reinstall.
The tray starts as soon as the install finishes and shows the example-landscape theme. A
balloon says “Marquee is showing an example theme”: click Marquee’s tray icon to open its menu. If you
can’t see the icon, it’s behind the ^ arrow at the end of the taskbar. Drag it onto the
taskbar to keep it in view.
Screenshot to come
The tray menu: the status line at the top, then Themes and Orientation.
Why the tray runs as administrator
Game FPS and taking the screen from L-Connect both need administrator rights. On an administrator account,
the logon task starts the tray with them. Starting Marquee from the Start menu goes through
the same task, so you get the same tray. Starting it while it’s already running just opens its menu.
On an account without administrator rights, the tray still shows themes, but game FPS and the L-Connect
handover are off, and its menu says why, for example “Game FPS is off: Marquee isn’t running as
administrator.”
The menu at a glance
The status line
The theme, its frame rate and the screen, or what stops it, such as “L-Connect is using the screen”. Under it, a line for each problem until it’s fixed.
Themes, Orientation
What to show, and which way up the screen is mounted.
Open preview, Edit theme…, New theme…, Import theme…
A preview window, the theme editor, and adding a theme.
Open themes folder, Open logs, Edit settings
Your files: the themes, the daily logs, and config.yaml.
Take over the screen from L-Connect, Always take over at start
Only one program can drive the screen at a time. Closing L-Connect’s window doesn’t free it, because
L-Connect’s background service holds it. When that happens, the tray’s status says L-Connect is
using the screen.
Open Marquee’s tray menu.
Choose Take over the screen from L-Connect. Marquee stops L-Connect’s service, opens the
screen and starts L-Connect again straight away.
To do this at every start, check Always take over at start. It shows only where L-Connect
is installed.
L-Connect then leaves the screen alone and keeps running your fans, pump and RGB. While its service is
stopped there’s a pause of a few seconds, in which your fans keep their last speed. The first time
L-Connect holds the screen, a balloon offers the takeover once. Clicking it takes the screen that one time.
To give the screen back, choose Pause or Quit in
Marquee’s menu. Then, in L-Connect’s tray menu, stop its service and start it again.
example-showcase-portrait on a vertically mounted screen.
In the tray menu, open Themes. Your own themes come first, then the installed examples:
example-landscape, example-portrait, example-agents,
example-showcase and example-showcase-portrait.
Open Orientation and pick how the screen is mounted. Choose landscape
for a horizontal mount and portrait for a vertical one. If the picture is upside down,
choose the -flipped version.
The tray remembers both choices in config.yaml. A theme made for the other shape is shown
scaled down rather than stretched, so pick one made for your mount: the portrait examples have
“portrait” in their names. Open preview shows what’s on the screen in a window.
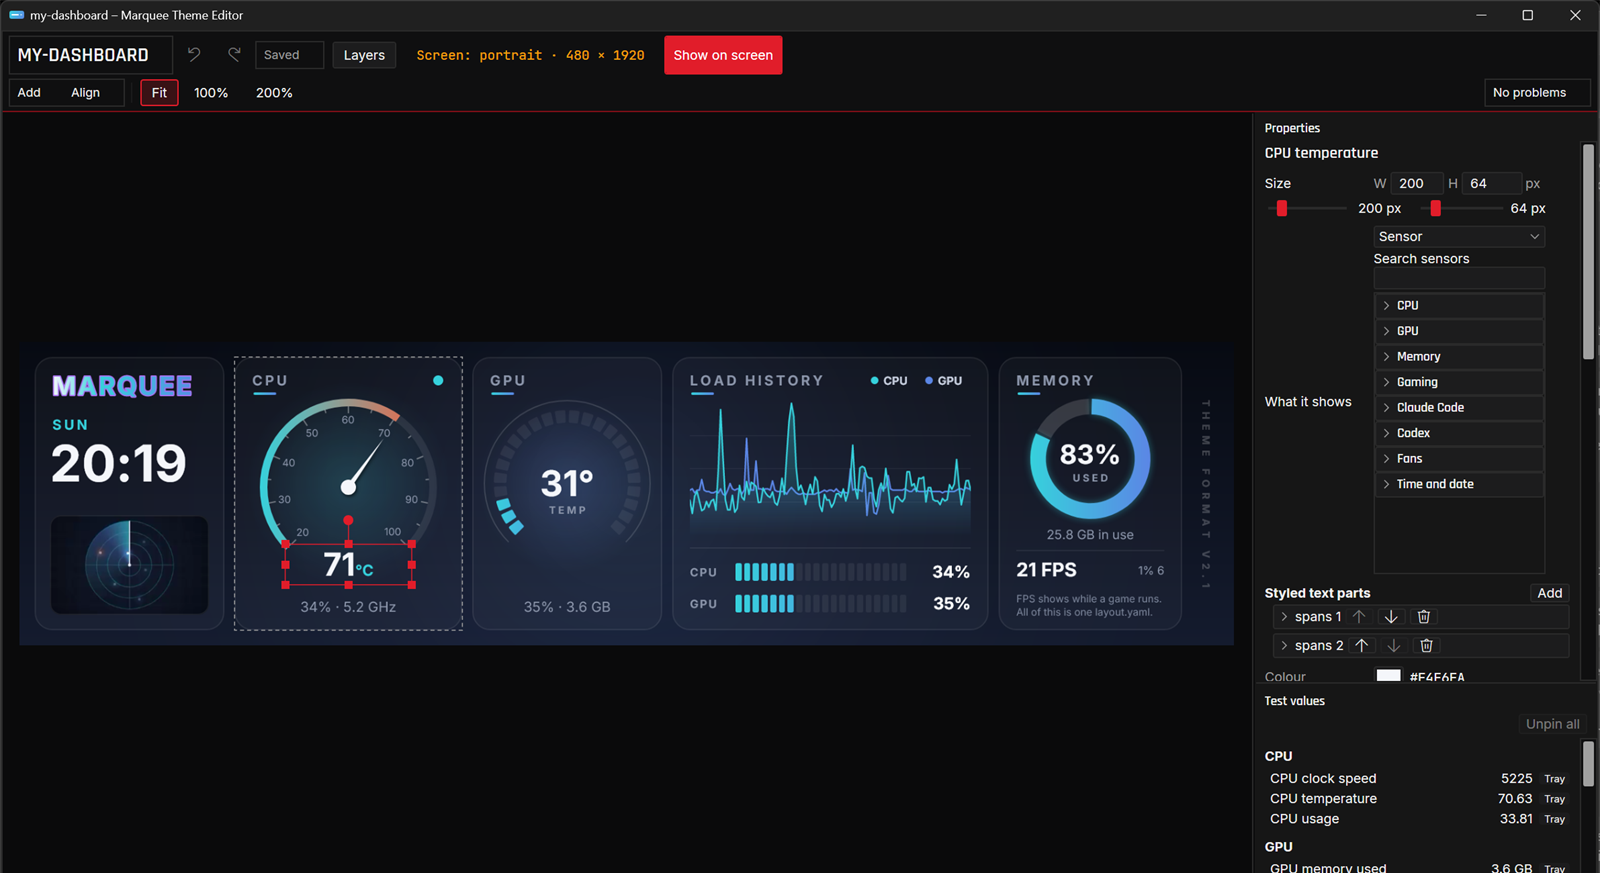
Open the editor: Marquee Theme Editor in the Start menu, or Edit theme…
in the tray (which opens the theme on show).
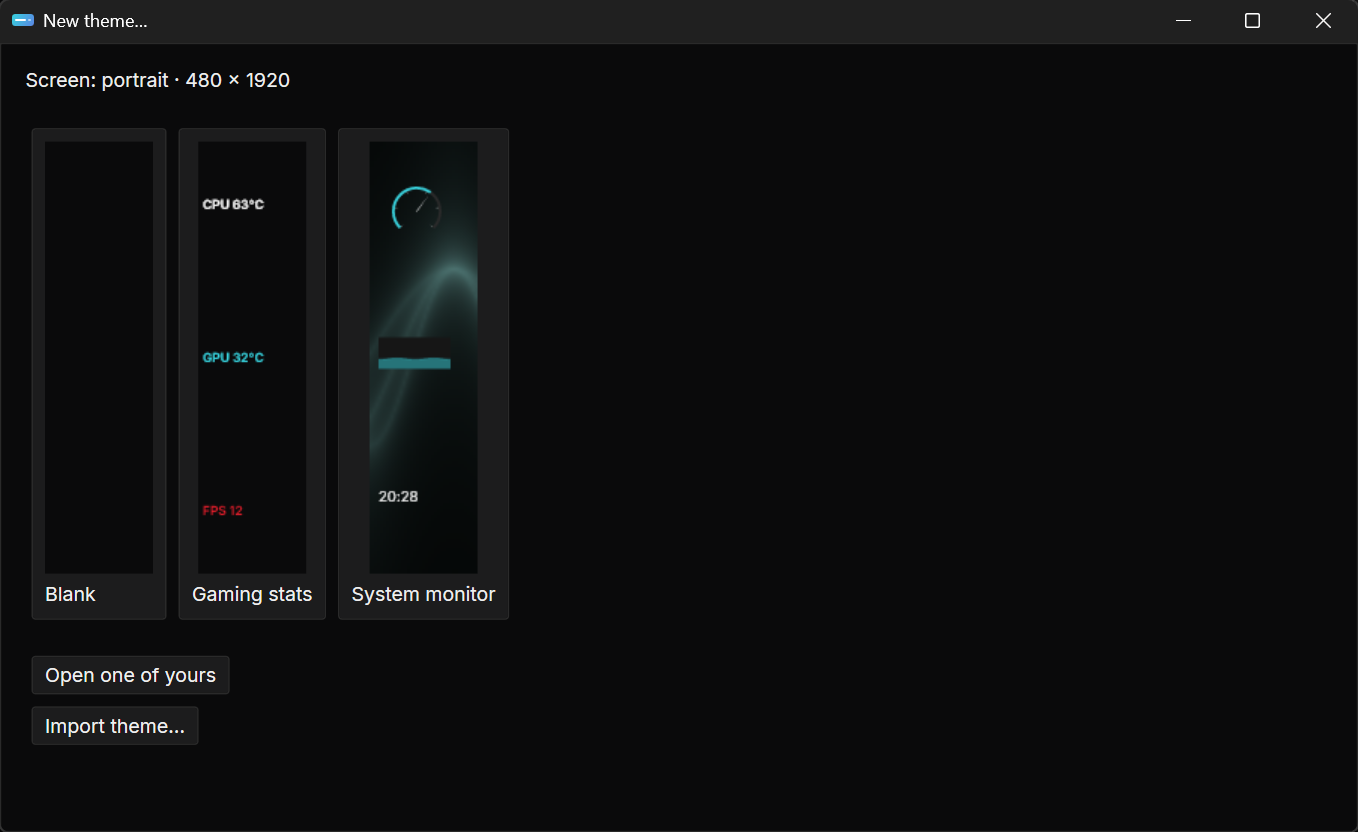
Choose New theme…, from the tray or from the editor’s theme menu. The start screen offers
Blank, Gaming stats and System monitor, with previews.
Pick one and name your copy. It’s laid out for the screen’s current orientation.
On a portrait screen, the tall previews can push Import theme… below the window’s bottom
edge. Drag the edge down to reveal it.
The start screen. Open one of yours opens a theme you already have, and Import theme… adds one from a ZIP.
The installed examples are read-only. To change one, accept the editor’s offer to make a copy, or open it
read-only to look around and choose Make a copy to edit later. The window bar shows
Saving…, Saved or Not saved. Ctrl+Z
undoes and Ctrl+Y redoes.
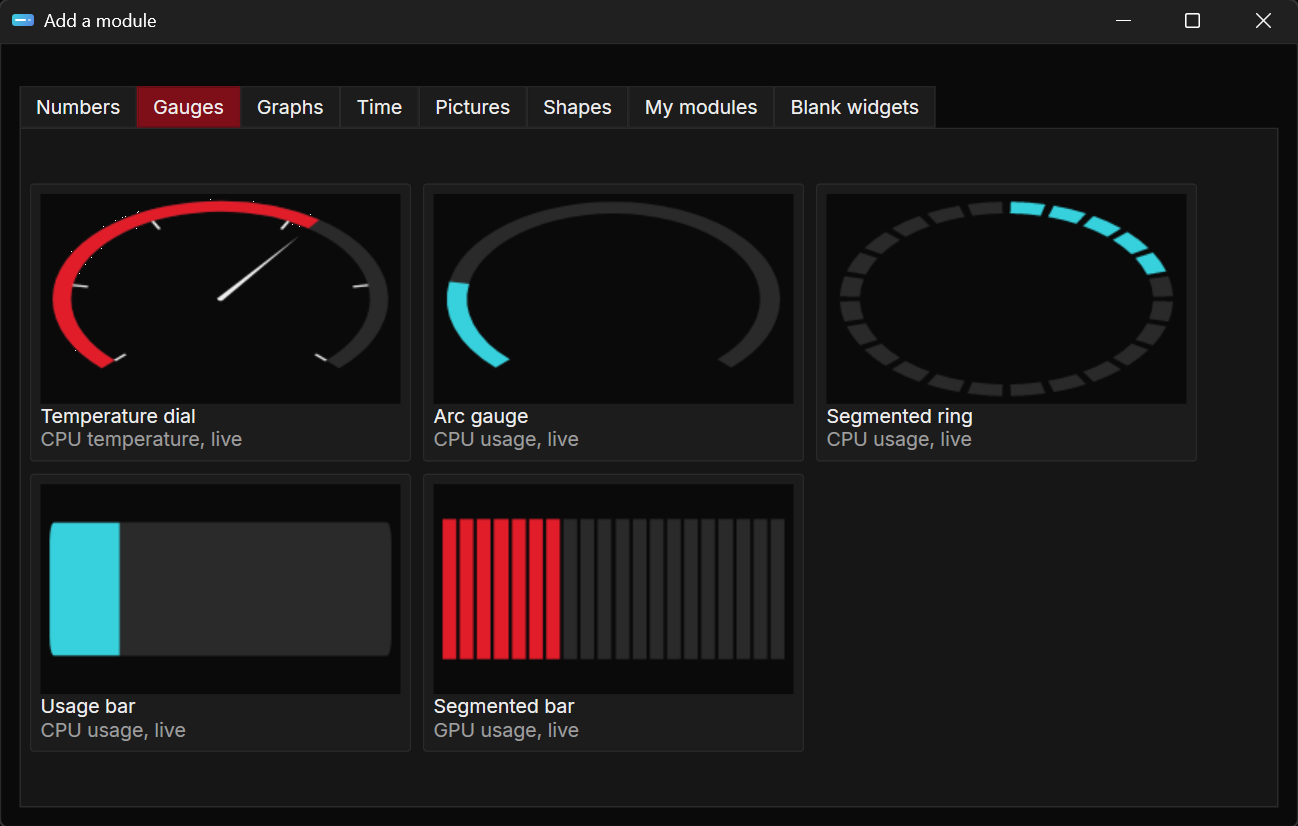
Click Add. The Add a module window has ready-made widgets on tabs:
Numbers, Gauges, Graphs, Time,
Pictures, Shapes, My modules and
Blank widgets.
Click a module to place it in the middle of the canvas, or drag its picture to where you want it. Picture
and video modules ask for a file first, and copy it into the theme.
Drag to move it, and use its handles to resize or rotate it. The arrow keys nudge it by one pixel, or ten
with Shift. Hold Alt while dragging to turn off snapping.
The Add a module gallery. Its previews show each module with readings.
A module can hold several widgets, such as a reading and its label, and each can be edited on its own. When
items overlap, open Layers in the window bar to select, reorder, hide or lock them.
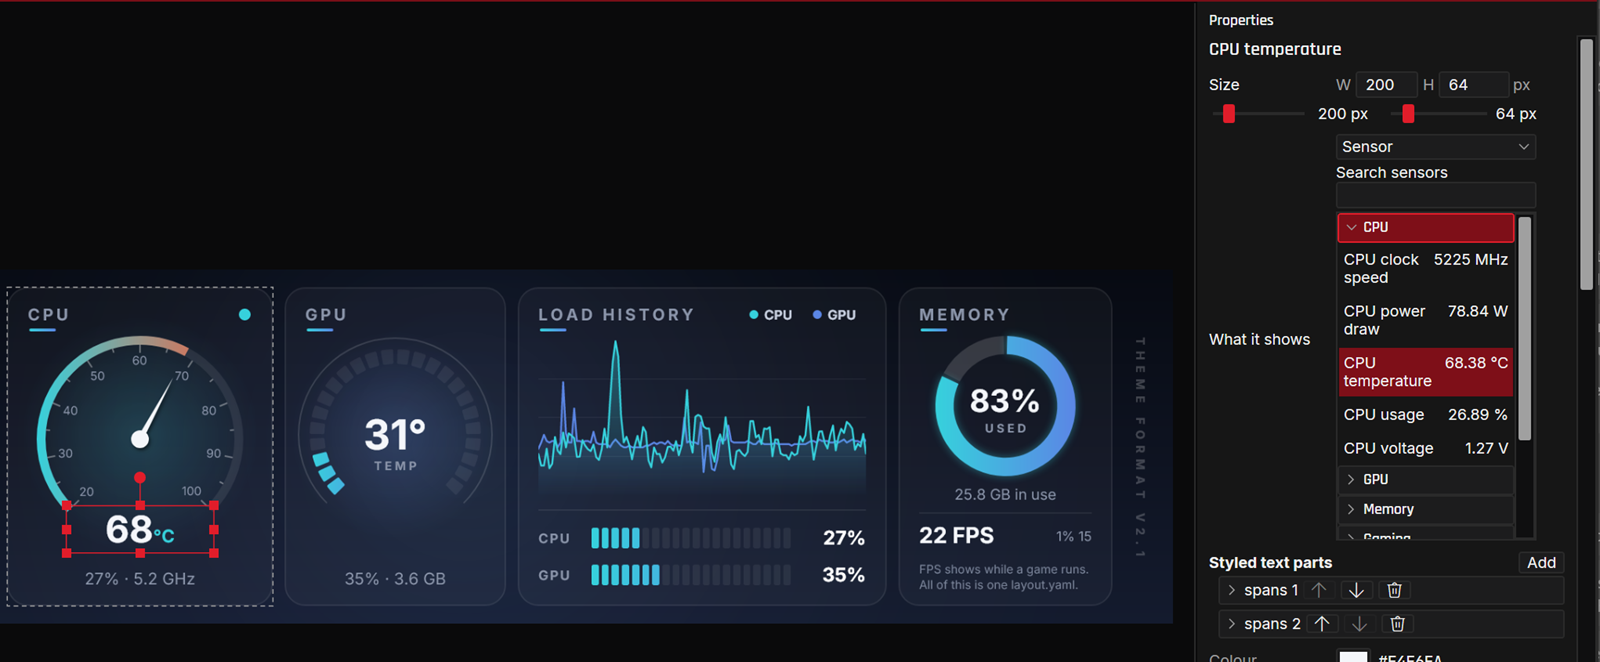
In Properties, find What it shows. Its list is set to Sensor.
Find the reading. The list gives plain names, such as CPU temperature, with their
current readings, in categories: CPU, GPU, Memory, Gaming, Claude Code, Codex, Fans, and Time and date.
The categories start closed: click one to open it, or type in Search sensors.
Click the reading. The canvas shows it straight away.
What it shows, with the CPU category open. Search finds a reading in a closed category.
Instead of Sensor, the list above offers Number, for a fixed value, and
Advanced, for an expression such as max(cpu.load, gpu.load). In a text widget, Insert value
puts a reading among your words, so a label can say “CPU” beside a live temperature.
The top of Properties covers the basics: what the item shows, its colour and its size. The
rest are in sections under More styling, such as Text,
Fill and border, Effects, Position and
Motion. These sections start closed. Click a heading to open it. They stay
as you leave them until you close the editor.
Can’t find a setting?
It’s probably in a closed section. Every setting as written in layout.yaml, at the
bottom, lists everything the item has. Click empty canvas for Theme settings: the
theme’s orientation, the LED ring, and the frame rate under
More styling → Motion.
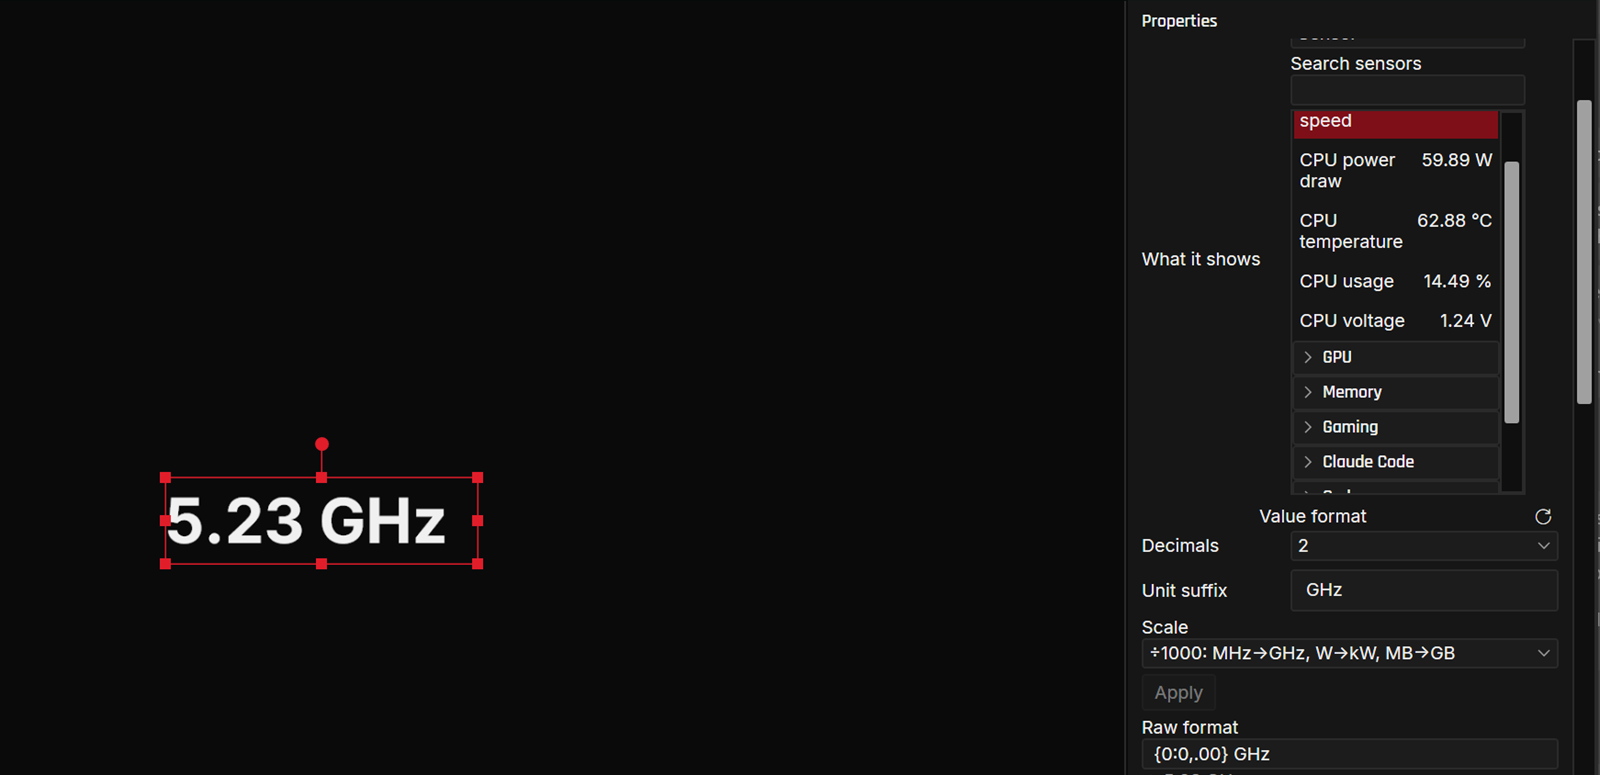
For example, to show a CPU clock reading of 5225 MHz as 5.23 GHz:
Select a value widget, and choose the clock reading in What it shows.
Under Value format, set Decimals to 2. You can choose
0 to 3; Default (up to 2) leaves it unset.
Type GHz in Unit suffix. Start with a space if you want one between the number and the unit: the suffix is used exactly as typed.
Set Scale to ÷1000: MHz→GHz, W→kW, MB→GB.
Press Apply.
The CPU clock’s 5225 MHz, shown as 5.23 GHz. Raw format shows what Apply wrote.
Scaling doesn’t change the unit for you, so type the suffix yourself. ÷1000 divides by exactly 1000, which
suits readings in MHz, W or MB. For byte counts, such as video memory, use the bytes helper,
which picks the unit.
Rules still compare the reading in its own unit, so a warning at 5000 MHz stays at 5000, not 5.
In a text widget, select the value chip. Choose ÷1000: MHz→GHz, W→kW, MB→GB from its
Scale submenu and 2 decimals, then type GHz after
the chip.
If the widget already has a format of its own, these choices leave it alone until you press
Use these number settings. The Raw format box is there for time,
duration and other custom formats.
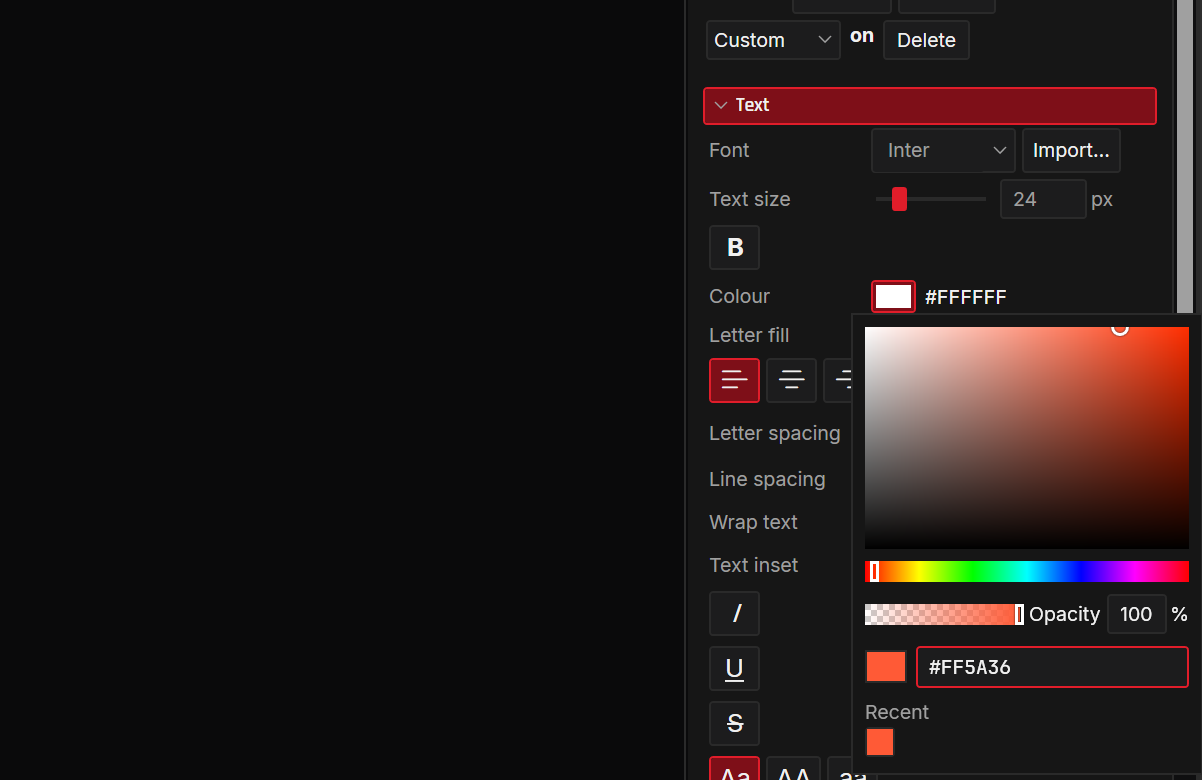
Click a colour swatch in Properties to open the colour picker.
Pick the colour, or type a hex value.
To make it see-through, type 0 to 100 in Opacity, beside the transparency strip, and
press Enter. 0% is fully transparent and 100% is solid.
The colour picker. Opacity applies to this one colour.
A colour that isn’t solid shows its percentage in Properties, for example #FF0000 · 50%. Paints
that take gradients also offer Linear and Radial. Text colour, box fill
and border are separate settings.
Widget opacity, under More styling → Effects, is a different setting:
it fades the whole widget, contents and all. 0% hides the widget.
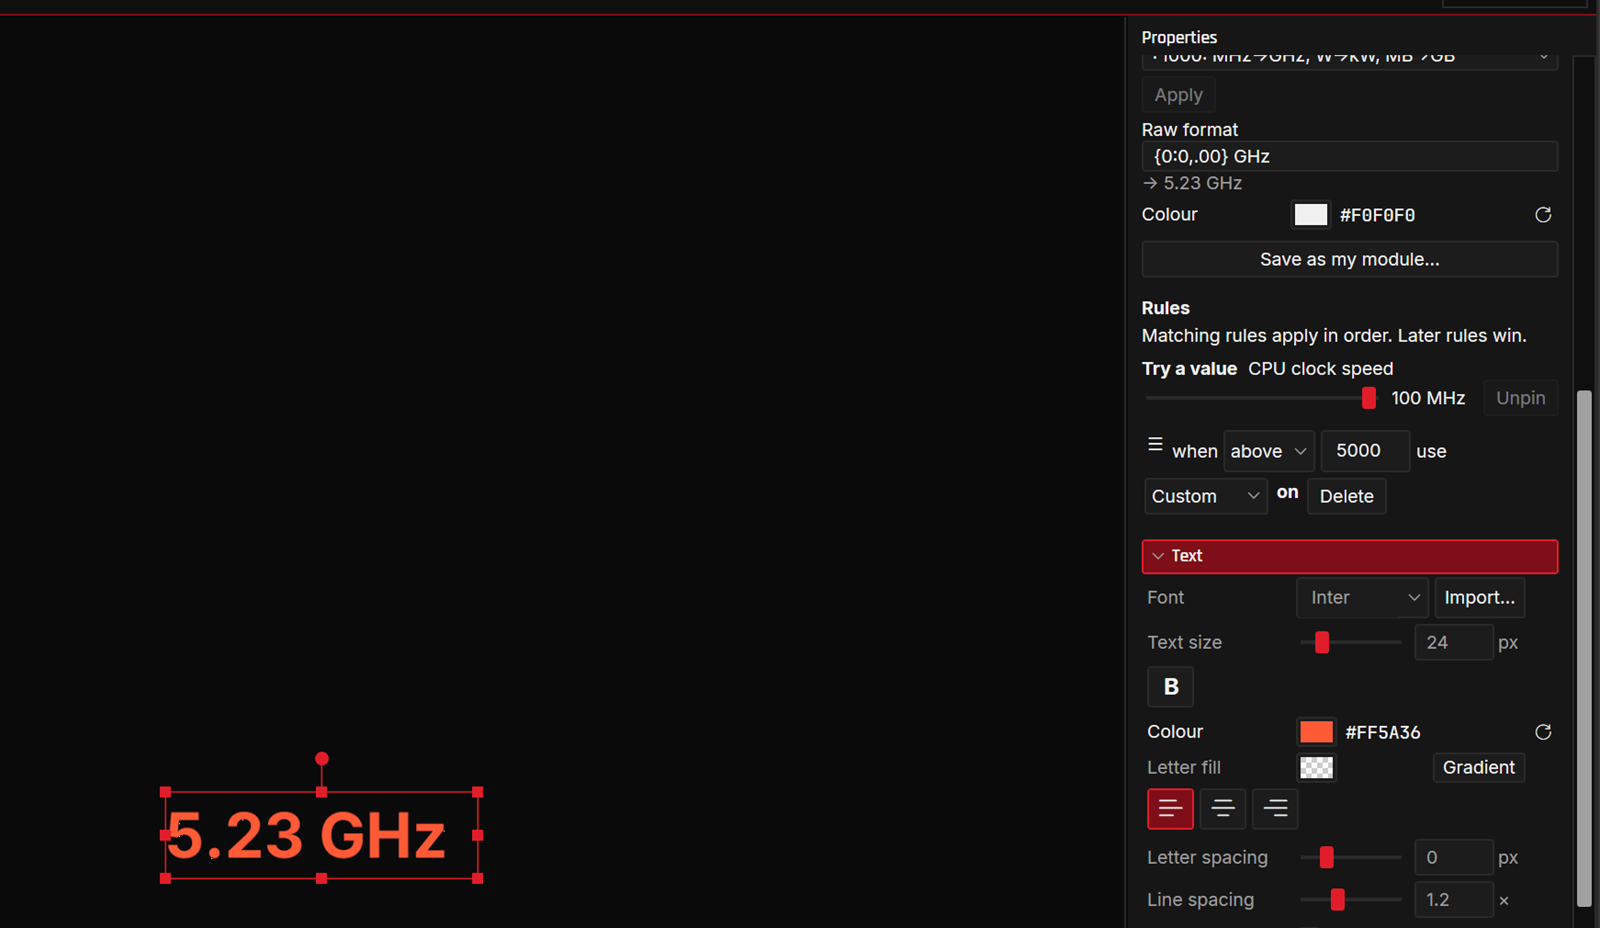
Rules change a widget’s style when its reading crosses a line. For example, to turn the clock reading from
Units and decimals red above 5000 MHz:
Select the widget. Under Rules, choose Add rule.
Set when to above and type 5000. The conditions are
above, below, equals and stale, which
means the reading is missing or out of date.
Under use, choose a named style, or Custom. For Custom, open its
Text section and set Colour to red.
A rule that turns the reading red above 5000 MHz. Try a value, above it, tests the rule.
“Above 5000” means more than 5000. Every matching rule applies, in order, so a later rule wins; drag rules to
reorder them. To check a rule without heating your CPU, drag Try a value across the
threshold, or pin a test reading in the Test values panel.
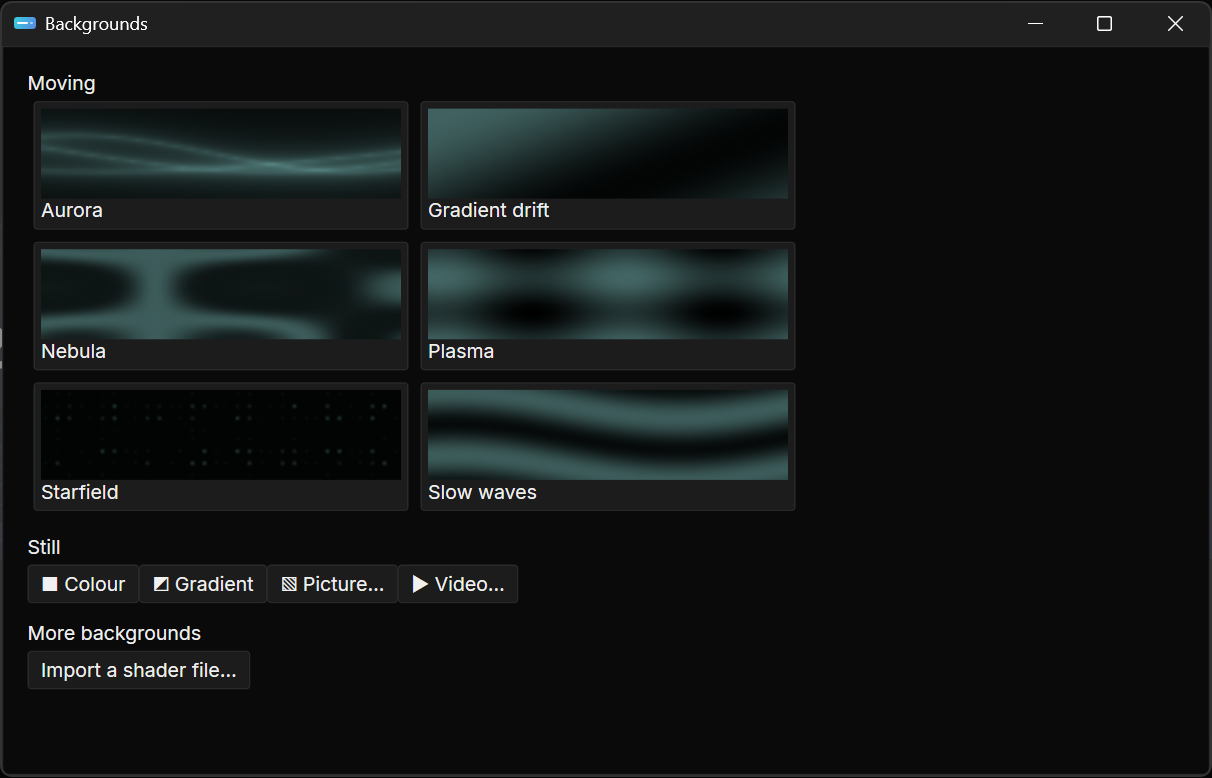
In its Background section, click Add layer ▾ to open the Backgrounds gallery.
Under Moving, pick a shader: Aurora, Slow waves,
Plasma, Starfield, Gradient drift or
Nebula. Under Still, pick Colour,
Gradient, Picture… or Video….
Select the new layer to change its colours, speed and strength.
The Backgrounds gallery. Its moving previews are live.
Reacts to ties a moving background to a reading: the Calm to
Busy meter shows how it responds. Choose Nothing for a steady one.
The cost bar gives a verdict, from Light. The screen keeps up easily. to
Too heavy. The screen will skip it. Lower Quality if it’s heavy. The
editor draws shaders on the CPU; the screen uses the graphics card, so judge the result there.
Video plays MP4, M4V, MOV and WMV through Windows’ own decoder, and animated GIF and WebP. H.264 works out
of the box; HEVC, VP9 and AV1 need Microsoft’s extension for that format from the Microsoft Store. A theme
can have up to 2 video layers and 4 videos in all, each file up to 200 MB.
More backgrounds → Import a shader file… adds a shader of your own.
The Fit, 100% and 200% buttons do the same from the
toolbar, and the status bar shows the zoom. At 100%, one theme pixel is one pixel of your monitor. Zooming
changes only your view, never the theme.
Click Show on screen, at the right of the window bar. Marquee sets your theme in
config.yaml, the running tray switches to it, and from then on the screen follows each save.
If the status bar says Tray not running, you can keep designing, but start Marquee from
the Start menu to drive the screen.
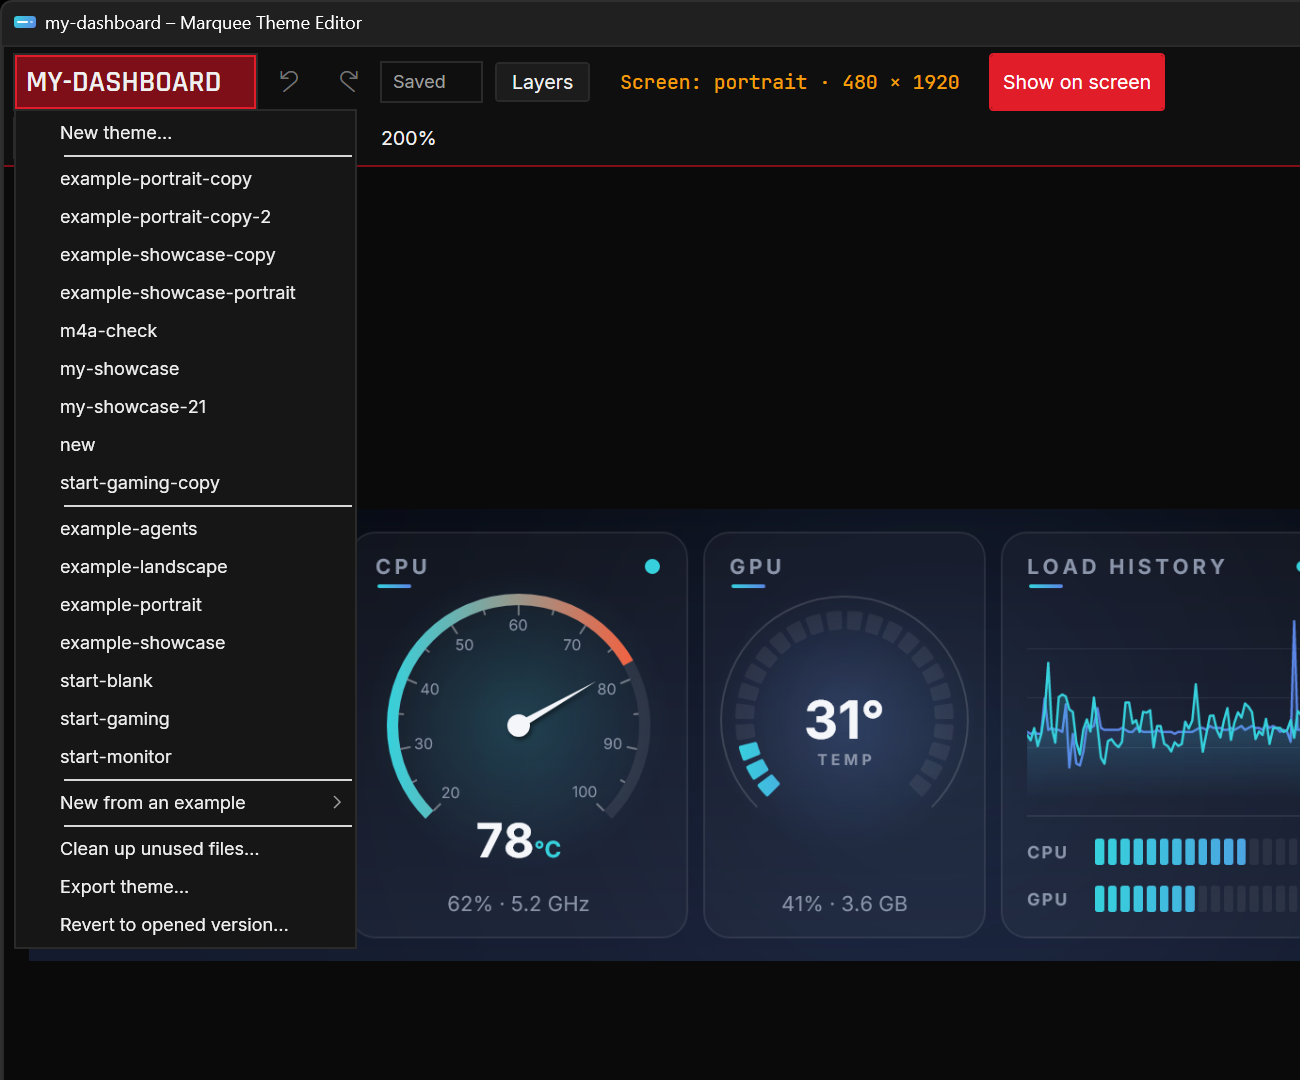
In the editor, click the theme’s name at the top left of the window bar. This opens the
theme menu. Its tooltip says “Open another theme”, but the menu also holds this theme’s own actions.
Choose Export theme…, near the bottom.
Choose where to save <theme>.zip.
The theme menu: click the name at the top left. Export theme… is near the bottom.
The ZIP holds the layout as it is in the editor, including changes not saved yet, and every file in the
theme folder that the layout names. Export never changes or tidies your theme. Fonts installed on your PC
aren’t bundled; a font file inside the theme folder is. Hidden files, ZIPs, backups, temporary files and
links are left out.
An imported theme’s shaders and videos run as soon as it opens in the editor’s preview.
Choose the ZIP itself; don’t unzip it first. There are three ways in:
The editor: choose New theme…, then Import theme… on the start screen (see Start a theme if you can’t see it).
The tray: choose Import theme… in its menu.
A terminal (a normal one, not run as administrator):
marquee theme import .\shared-theme.zip
Add --name my-copy to install it under another name, or --replace to replace a
theme with the same name.
Marquee checks the ZIP before installing anything. A ZIP with errors shows what’s wrong and installs
nothing. Only layout.yaml and the images, videos, fonts and shaders it uses are installed, and
the report lists anything skipped. If you already have a theme with that name, choose
Rename, Replace or Cancel.
An import from the editor or the tray opens the theme in the editor. It doesn’t change what’s on the
screen: pick it from Themes in the tray, or use Show on screen.
Install HWiNFO and start it. Sensors-only mode is enough.
Open HWiNFO’s Settings, turn on Shared Memory Support and click OK.
Keep HWiNFO’s Sensors window open. Minimise it rather than closing it: HWiNFO shares
readings only while its sensors are running. Marquee marks a hardware reading stale (—) after five
seconds without an update.
Set sensors: hwinfo in config.yaml, as above.
Screenshot to come
HWiNFO’s settings, with Shared Memory Support turned on.
HWiNFO’s own settings can start it with Windows, minimised, so the readings are there whenever the tray is.
If Marquee can’t find the readings, its tray menu says: “HWiNFO’s shared memory isn’t available. Start
HWiNFO (sensors-only mode is enough) and turn on Settings → Shared Memory Support.”
In the editor you pick readings by name. In YAML and expressions, each reading has a key, such as
cpu.temp, gpu.load, fps.1pct_low or claude.five_hour.pct.
The sensor key reference
lists every key, with its unit and source:
Hardware: CPU, GPU, memory, fans and voltages.
FPS: the game in front, from the bundled PresentMon.
Claude Code and Codex: usage limits, reset times and sessions.
Custom: values your own scripts send with marquee push.
To see what this PC reports right now, run this in a terminal:
marquee sensors
marquee sensors --raw also lists the readings that the hardware source has but Marquee doesn’t
map to a key.
Choose Take over the screen from L-Connect (see above).
There’s no takeover item in the menu
The tray isn’t running as administrator, and its menu says so. Quit it, then sign out and back in, or run
marquee task start in an administrator terminal. If someone turned the logon task off or
changed it, run marquee task install there first. For a one-off, marquee claim-screen
in an administrator terminal hands the screen over once.
The takeover failed
A balloon and a menu line say why. Marquee never stops another service that depends on L-Connect’s: if one
is running, L-Connect keeps the screen.
“Waiting for the screen”
Another program has it, such as a marquee run in a terminal or another user’s tray. Pause or
close that one. If the screen was unplugged, Marquee finds it again when it’s back.
A reading that’s missing or out of date shows as —.
No CPU temperature or motherboard sensors (LibreHardwareMonitor)
Install the PawnIO driver, and make sure the tray runs as administrator. Or switch to HWiNFO.
No GPU temperature, clock or power on an AMD card
Some cards don’t give them to LibreHardwareMonitor. Use HWiNFO.
Everything went stale with HWiNFO
HWiNFO’s Sensors window was closed, or Shared Memory Support is off.
No game FPS
FPS needs the tray running as administrator. The menu shows “Game FPS is off: Marquee isn’t running as
administrator.” if it isn’t. FPS is measured for the app in front, so the desktop shows none.
No Claude Code limits
Marquee needs a native claude.exe install, or the desktop app’s bundled copy, signed in to a
claude.ai subscription. An npm-only install isn’t enough. Check the account with /status in
a terminal Claude session.
The editor shows readings, but the screen doesn’t
When the tray isn’t running, the editor fills in Sample values; the
Test values panel says where each reading comes from. Run marquee sensors
to see what the PC really reports.
Once a day, the tray asks GitHub whether there’s a newer release. That single request is the only
automatic one Marquee makes itself. It sends no account and no cookies.
A newer version shows as a balloon and as Install Marquee <version>… in the menu.
Nothing downloads until you click one.
The tray downloads the installer and its signature into a folder only administrators can change. It checks
the signature against the public key built into Marquee, and runs the installer only if it matches.
The screen goes dark while the installer runs, and the new version starts. If the update doesn’t install,
the screen comes back, a balloon gives the installer’s exit code and log, and the offer stays in the menu
to try again.
A missing or wrong signature means nothing is installed, and the log says why. A tray without administrator
rights can’t install updates: its offer, Download Marquee <version>…, opens the
release page instead. Check for updates checks at any time. updates: off in
config.yaml stops the daily check.